Rainbow Wall Approach and Rappelling Beta

30 10 2009

I hear that a lot of people get lost in Red Rocks. Often I will start wandering the wrong way only to have Lizzy call me back to the path. In the end it’s no fun getting lost and it takes a lot of time.  The Rainbow Wall is stunning and really not that far away. While it make take some people over three hours the hike should be doable under two hours with bivy gear if you don’t get lost.

One can either approach from Oak Creek or Pine creek. I am pretty sure the Pine Creek trail is shorter but it requires you drive in the loop road. This is the way we took so I will describe my experience.

Red Rocks - Oct 09 018

Starting out the hike from the Pine Creek Canyon parking lot.

If you have climbed in Pine Creek and done either the classic Cat in the Hat or Dark Shadows then the above photo should look pretty familiar. The small red capped tower/formation in the middle of the shot is named the Mescalito. You walk towards this formation passing three or four turn offs for nature walks, fire trails and other areas.  A good 15 – 25 minutes out from the parking lot there will be a homestead on the left followed shortly with a sign similar to the one in the photo below. This sign should have a leftwards arrow pointing to the Arnight Knoll trail. This is the trail you take to get into Juniper Canyon.

Red Rocks - Oct 09 023

Making the second turn.

One travels towards a ridge through some bushes and you will eventually encounter the sign above. It is pretty obvious but go left (the only real option).   This will quickly bring you to another junction where you stay left again. This is shown in the photo below. This left turn (the third from the main trail) will take you up a hill to the top of the aforementioned ridge which is really more of a plateau. The trail is pretty flat and you should make good time towards Juniper Canyon. Do not turn off this trail, trending up and right towards the entrance to Juniper Canyon. Be careful of the many types of cactus that line the trail.

Once you travel a ways across the plateau head towards the center of the canyon. The trail will split many times to the side areas, with Crimson Chrysalis and Cloud tower on the left. We stayed on the well cairned trail which led us up the right side of the canyon. Eventually you will work your way down into a wash which can be tricky to follow. Most of the way there are cairns but use good judgment to make upwards progress.

[Edit: So, Luke has oversimplified this a little, I think. The main idea here is that you start on official hiking trails – first the Pine Creek Trail, then the left turns get you onto the Arnight-Knoll Trail, then you stay right on the Knoll Trail when the Arnight Trail splits off, then you have to turn right-ish off the Knoll Trail to head into Juniper Canyon – if you stayed on the Knoll Trail it would take you to Oak Creek Canyon. As I recall, this turn is obvious and intuitive, but just realize that there is a point at which you go right, into Juniper Canyon, instead of bearing left (on the main hiking trail) across the plateau to Oak Creek. ~Lizzy]

Red Rocks - Oct 09 024

Make sure to go left and then up the hill!

After a ways in the wash the trail should get better and eventually head up a steep sandy hill. Make sure to follow the trail and stay a bit to the right. There is a well traveled trail after you get to the top of the hill. This will lead through some trees and eventually to a distinct Y with a cairn. This is the split for the Rainbow wall, left, and the Brownstone wall, right.  The left fork will take you to the left edge of the canyon where you can make good progress right next to a wall. Eventually you will break back into the wash and eventually come upon the slabs seen in the photo below.

Red Rocks - Oct 09 174

Roberto coming down the fixed line.

Hand over hand up the fixed line and make your ways up the slabs via the path of least resistance. We started up the left and did a lot of zig-zagging before finishing up the right side. At the very top you will need to stay right in order to get to the upper most ledge and the start of the Original Route. Ideally you approach to the base of Sauron’s Eye and the traverse left about 200 feet. There are two places to bivy at the base, one on a crazy stone pedestal and one in the sand directly below the base. There were a ton of bugs when we bivyed so I would suggest bug netting or buy spray.

Red Rocks - Oct 09 162

You top out here. The tree to the right of the rope has rap slings and biners. (Rap Photo 1)

Red Rocks - Oct 09 163

You make a short rap down to this tree. (Rap Photo 2)

Red Rocks - Oct 09 164

Just to the right of the tree, on a ledge, is a set of bolts! (Rap Photo 3)

Rappelling Beta for a 70 meter Rope.

Rap from a tree  (at the top of the final gully/pitch) with slings and biners (Rap Photo 1 above) or down climb ~50 feet of 4th and 5th class. This will get you to the  the bolts next to the dead tree in (Rap Photo 2 and 3 above).

From here you should definitely knot your ropes since you have to swing HARD to get back to the belay after the Red Dihedrals.  I had to swing way left and then back right to get to the belay. Since I was holding the rope I had to use my feet to grab the small foot ledge. Very close!

Next you can rap straight down on independent rap stations on the face.  Two raps will put you on the ledge about 40′ below the Red Dihedral and on the far side of the Over the Rainbow ledge.

Rap to a station on a small ledge in the middle of the face skipping an anchor about 25′ below the main ledge. From here rap again and with a 70m rope you will just make it to a ledge.

There was another rap anchor on the face that could be used if you have a 60m rope or don’t want to down climb. We opted to rap off the end of our rope and did  one easy 5th class move to get down to the gully/ledge with the fixed rope.

From the rap station behind a small tree rap the two 5.10 pitches. If using two ropes be careful of getting the knot stuck in the branches.

Rap each of the 5.11 pitches. Next to a bush below one of the belays there is a rope eating crack. I wedged a twig in here so our rope would not get stuck.

The final rap from the top of the blank 5.12 corner will require a short downclimb since it was about 40 meters to the ground.

Take a look at the photo topos below showing the rap stations that are mentioned.

60 meter Rap Beta

With a 60m rope I assume you would need to make an intermediate rap to the cave belay from the bolts next to the dead tree. From here you should be able to rap straight down to the Belay atop the Dihedrals and continue with the description above. It might be necessary to use one or both rap stations we skipped descending from Over the Rainbow ledge to the lower ledge.


Rainbow Wall - Upper Pitches

The upper pitches.

Rainbow Wall - Lower Pitches

The lower Pitches

Enjoy,

Luke


Incredible Hulk Topos and Information

15 10 2009

It all started on Labor Day of 2008, Lizzy was away doing geology and I needed to go rock climbing. A friend from the gym, Konstantin, suggested that we climb the Red Dihedral on the Incredible Hulk. After doing the route we proposed that almost a year later we should come back, on the 4th of July and do Positive Vibrations. A lot of climbing, training and maturing later we climbed Positive Vibes this past July. I was so amazed by the route I wanted  do it with Lizzy and so in August we went back and climbed both the Red Dihedral and Positive Vibrations.

Peter Croft and Conrad Anker climbing  Solar Flare from Jeffery Morse on Vimeo.

On my first time up Positive Vibrations we got a bit lost and I became intrigued by the variation pitch I had led and wondered about the other routes on the face.  I surfed the web, posted on Supertopo and came back with a bunch of information.

I also ended up buying the awesome High Sierra: Peaks Passes and Trails  by RJ Secor. This book had been suggested multiple times and I was able to previewed it on Google books and saw the Hulk section had much of the information I was looking for. There were route descriptions for all of the major routes on the Hulk as well as a rough photo overlay with route lines.

Sadly not all is improved in the 2009 3rd edition. My friend Shay has the 2nd edition and on our trip to Mt Langley we discovered his book has a photo topo of the Keyhole Wall, but mine does not…

http://www.chesslerbooks.com/eCart/viewItem.asp?idProduct=6966

Topos for the easier routes on the Hulk can found on Supertopo.  You can get a free topo of Red Dihedral and more info about Positive Vibrations and SunSpot Dihedral here:

http://www.supertopo.com/routebeta/highsierra.html

To get the full Positive Vibrations and SunSpot Dihedral topo you have to buy the High Sierra Guide.

An alternate topo for Sun Spot Dihedral can be found here:

http://www.redrocksguidebook.com/forum/viewtopic.php?f=8&t=30

In my research I was able to track down a bunch of topos by Dave Nettle

Airstream 5.13b:
http://www.supertopo.com/topos/obscurities/Airstream.jpg

The Venturi Effect 5.12+:
http://www.supertopo.com/topos/obscurities/venturieffect.pdf

Tradewinds 5.11d:
http://www.rockclimbing.com/photos/Topo/Topo_91373.html

I also found a fairly cool article about Eye of the Storm (V 5.12, 12 pitches, 1500 feet) but no topo….
http://www.alpinist.com/doc/web07f/newswire-incredible-hulk-davis

The MoonBlog confirmed that  Airstream had seen a 2nd ascent by Nic Sellars and Tom Briggs.

I pulled the following post from my feed reader since I could no longer track down the actual blog entry from September 2007:

Nic Sellars and Tom Briggs have just returned from a trad climbing trip in the states where amongst other things they made the 2nd ascent of a classic Peter Croft route called Airstream. Nic sent in this report.

“Just got back to Blighty after a fab month long trip to the states to climb in the High Sierras on an Alpine rock trip. Tom Briggs and I managed to make the 2nd ascent of Airsteam, a 12 pitch Peter Croft route on a crag called The Incredible Hulk. The route comprised numerous pitches of 5.11 (E4 ish) up to the crux pitches of 512c (7b+), 513b (7c+), 512c. We managed to on-sight all pitches except the crux pitch which managed to squeeze in all it’s difficulty into about 15 ft of slippery groove technical shinaniggins. I red-pointed this by the skin of my teeth as I was fairly trashed by the climb up to this point. All in all we took 12 hours from bivvi to bivvi. The next day we quested down to a very hot and sweaty Bishop to contratulate Peter on his route with some beers (and meet up with a real US role model). Hope the photo attachment arrives in a useable state.”

Larger View

Since I was not content with the currently available information I started putting together some more information. This coincided nicely with a few additions that Scott Bennett made to the Incredible Hulk Mountain Project page. The comments he had made, the Nettle topos, combined with my experience and the Secor book allowed me to create the following photos. I’m still working to get all of the routes in photo topo form and will eventually be including BlowHard 5.12+, Solar Flare 5.12+, SolarBurn 5.12+, Airstream 5.13b and Eye of the Storm 5.12+ when I’m finished.

Above and below are the photo overlay topos that I made.  Feel free to leave comments here or on MP.com

Larger View

Enjoy,

Luke


Mount Conness Approach Beta

21 09 2009

It seems that the approach for Mt Conness can be a bit confusing so here are some photos with the route we took on our way to climb the Harding Route on the Southwest Face. This is the more direct of the two approaches from Saddlebag Lake and supposedly is about 4.5 miles long with 2,500 feet of elevation gain. It took us around 3.5 hours a moderate pace with a few rests. It took another 30 minutes to descend from the summit plateau to the base of the route. On our way back it took less than two hours from the true summit to the car.

This approach starts at the Sawmill Campground (near Saddlebag Lake) and I believe is the shortest distance to the top of Conness. From the parking lot hike out the good trail/road through the campground passing sites for a while. At some point the trail will narrow a little but stays quite good all the way to the Carnegie Institute.

Approach

Looking up hill where we left the trail.

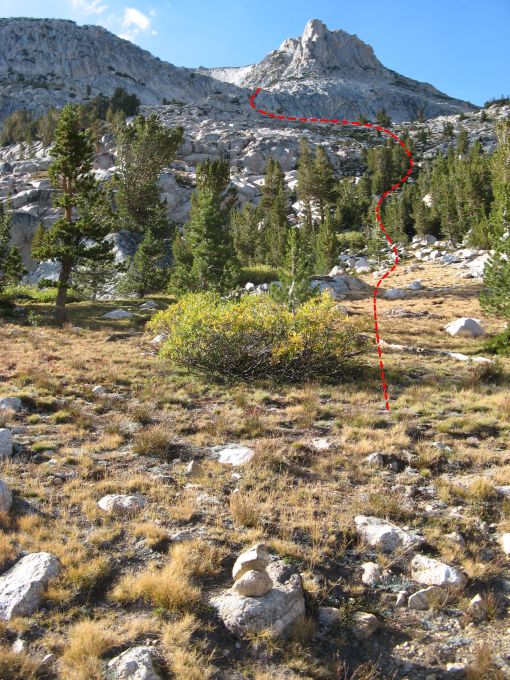
About 15 to 20 minutes past the Carnegie Wooden Shed we left the trail and started the cross country travel. There were a bunch of cairns on the right side of the trail marking the general area you leave the trail.  The basic idea is to head up hill taking the easiest path towards the peak seen in the photo above and below. A bit of hiking  will lead to a clearing and you should be able to see something similar to the first photo below.

ApproachA

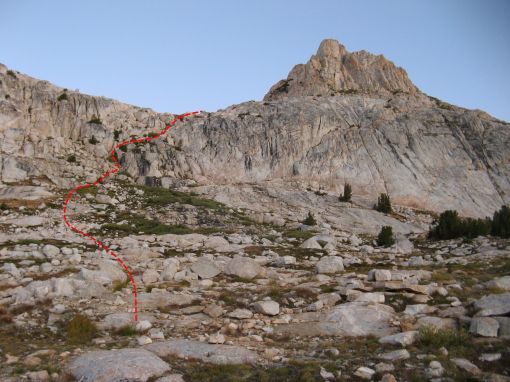
Looking up at the ledges from the first flat spot.

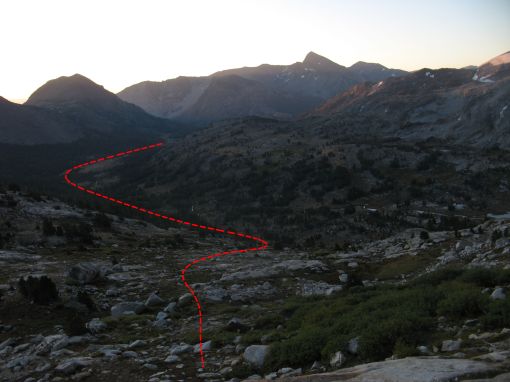
ApproachDown

Looking back at the approach before going up the ledges.

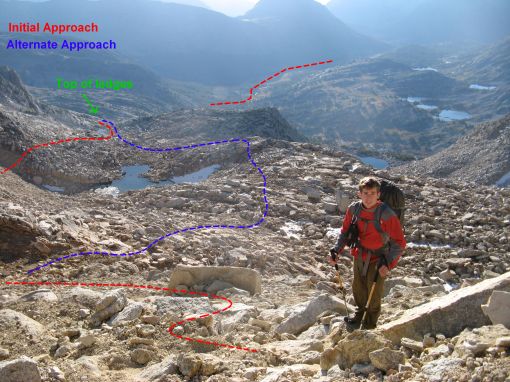
Once you reach the  large flattish clearing you will be need to go up and over a set of ledges on the left side. There should be a faint trail and possibly the occasional cairn. This set of ledges will lead you to another large flat area that should have a small lake (size depends on season).  From here there seemed to be two options to gain the steep slope that leads to the summit plateau.  On the way in we stayed north (the right side looking uphill)  of the second and bigger lake and followed the red path in the photo below. This had us going along the ridge which was fine. On the way back we went on the other side of the big lake seen in blue below. Both paths met up in the meadow near the smaller lake and went over the 3rd class ledges in a photo seen above.

ApproachDownE

Looking down at the approach from the steep switchbacks

Our approach followed the ridge seen below to some steep switchbacks which ended at an obvious notch.  While the switchback section was a bit steep there was a trail most of the way and you could tell this section had seen a bunch of traffic. It is pretty hard to get lost if you aim for the notch in the photo below.
ApproachB

The very pretty ridge line with a steep drop on the right.

Below is another view of the ridge approach from the steep switchbacks.  After gaining the notch at the top of the steep switchbacks you will be at a large plateau below the summit. This was the first time we could see the summit of Mount Conness from the approach. We had only previously seen the lower section of the North Ridge. Cross the sandy plateau and you should see a large cemented cairn and a few wind breaks with more cement and some USGS circular markers. This is where we left our packs and racked up for the climb.
ApproachDownB2

Almost to the notch after a bunch of sandy switchbacks.

From this point continue down to either the  second or third gully (I don’t remember which).  As noted in the Supertopo don’t go down too early since the first gullies cliff out.  Also you should be able to see the SW face in full view from the top of the gully. There is a trail, that should not be followed, that keeps going down past the correct gully so if you go more than 5-10 mins from the edge of the sandy plateau you have gone too far.  A few 3rd class sections lead to scree surfing and talus walking towards the Southwest face.  The photo below was taken from the approach.

ConnessHardingRouteTopo

The First few pitches, as we climbed them, on the Harding route of Mt Conness.

As described in the Supertopo the route starts just right of a section of black rock which is often wet.

Good Luck!!

– Luke


Indian Creek 101 – Cragging and Gear Beta

16 06 2009

Lizzy and I are from SoCal and by no means Indian Creek locals. However a love for crack climbing has brought us to the creek for a wonderful week of climbing each of the last two years. Over these 15 days spent at the creek we have gained a bit of information that could be helpful to first timers. This is by no means a complete resource but a similar to CragReviews and TripBeta seen on other blogs. If anyone has other useful information please post up a comment. I will be doing a follow up post on good rest days around Moab, UT sometime in the next few weeks (though it took me almost 3 months to finish this post…).

indian-creek-march-09-006

Sorting cams before going to IC.

Gear

To say that climbing at Indian Creek is gear intensive really misses the point.  The lengthy pitches, eighty to over one hundred and seventy feet, in addition to the the splitter nature of the cracks, require an immense number of cams. We have a pretty large rack by most standards, with at least five or six cams in each size, but we still need to borrow more. So before heading to IC, find as many friends as you can and plead with them to borrow all their cams. Most cracks are dead vertical and do not wander negating the need for quickdraws or slings. Also, the parallel nature of the cracks almost completely eliminates the use of nuts. There are exceptions to both of these rules and beyond hints from the guidebook you will often be able to tell from the ground if you need nuts or slings.  At a minimum you will always want at least 2 quickdraws or a sling since most of the climbs have a bolted anchor.

In 2008 our rack consisted of  four or five of each cam between Lizzy and I and we ended up borrowing around ten more of each size from friends. It was nice to have fifteen of each size but it was really overkill and heavy to boot. There are definitely climbs at Indian Creek that require ten or more cams of single size , such as Bunny Slope, Steve Carruther’s Memorial, and Christmas Tree but for the most most cracks have some variety so you only need six to eight cams of each size. For example, on the classic Supercrack you would bring a few small cams for the start and then around three #2’s, six #3’s and one or two cams in the #3.5 or #4 camalot range. According to the Bloom guide: (1)1.5 (1)2.0 (1)2.5  (2)3.0 (5)3.5

Once you work out having a bin full of cams you need to figure out how the different brands overlap. In a place like Indian Creek, where you have every size of crack, it can be beneficial to own different brands. Sadly our cam of choice, the camalot, does not quite fill all the sizes and in certain cracks the lobes become too tight or tipped out.  We do not have this issue in the smaller sizes since we own many different brands of cams.  The Bloom guidebook attempts to list approximate crack size in inches that directly correlates to the size of Wild Country Friends.  Ill try to do my best to portray our experience with the cams we have used at Indian Creek.

Cam Sizes

Size,   Size according to Bloom/Size in Inches,    Cams listed smallest to largest per that size

Sub Tips 0.10 000 C3, Ballnuts
Tips 0.20 00 C3, Black Alien, 00 Grey TCU, Ballnuts
Tips/Thin Fingers 0.30 0 C3. Blue Alien, 0 Purple Tcu, .2 MicroCamalot
Tight Fingers 0.50 Blue Tcu/Master cam,  Green Alien,  .3 MicroCamalot
Fingers 0.75 Yellow Alien, 2 Yellow Tcu/Mastercam, 2 C3, Grey Alien
Off-Fingers 1.00 Grey Alien, 3 Orange Tcu/Mastercam, .5 Purple Camalot, Red Alien
Stacks/ Thin Hands 1.50 4 Red Master Cam, .75 Green Camalot, 5 Black Master/Power Cam
Thin hands/ Tight hands 2.00 5 Black Master/Power Cam, 1 Red Camalot
Hands 2.50 2 Yellow Camalot, 3 Purple Friend
Wide Hands 3.00 3 Purple Friend, 8 Purple Power Cam, 3 Blue Camalot
Fists 3.50 3 Blue camalot. 3.5 (old) Grey Camalot
Fists/ Off Fists 4.00 3.5 (old) Grey Camalot, 4 Grey Camalot
Offwidth > 4.5 4 (old) Purple Camalot, 5 Purple camalot on up.

So in the chart above I listed few cams in multiple sections which is because of the lack of sub increments in the Bloom guide in the upper sizes.  A 2.5″ crack will fit a #2 camalot perfectly but as that crack approaches 3″ there is a size where it is useful to have a #3 Friend or an 8 Purple Power Cam before you can get in a bomber #3 Camalot. This size is usually labeled 3.0 in the book but sometimes a #3 camalot will fit in a “3.0” crack. The same is true of the Black Master/Power cam which nicely fits in between a .75 camalot and 1.0 camalot. We usually use #1 Camalots when we see 2.0 in the book despite the fact that #1 camalots are closer to 2.25. So if you see a large number of cams in 2.5 and 3.0 or 1.5 and 2.0 it can be good to have one of the previously mentioned in between pieces.

indiancreek-march090102

Gotta have the crash pad for days in Big Bend.

Taping

So there is a lot of ranting about taping your hands when crack climbing. While some attribute tape to aid, others won’t climb without it. In many ways crack climbing can be painful as you torque your hand to fit in a crack since there is no hold to grasp and pull down on. Attempting to fill this void and get your digits to stick can be assisted by tape since it lessens the pain and in some cases makes it easier. Tape can easily change the size of your hands or fingers to allow them to better fit a specific size crack. As well taping helps reduce the amount of wear on your skin and often allows you to twist harder.  The skin on the backs of your hands is important since practically every move of every climb of every day is a jam.  Some may find exceptions with the occasional lay back or face hold but the reason people come to Indian Creek from around the world is the jamming.

For thin hand cracks I usually avoid tape since I need to sink as much of my hand in the crack as possible. However having a few layers of tape or a tape glove can make a hand crack much nicer. The same is true for fist and off-width climbing where tape is essential to the survival of your skin. Tape does allow a climber to be sloppy with their jams and can take away ones feel of the rock. I will tape my index finger and middle finger when doing finger stacks and ring locks to preserve my skin but I tend to climb finger cracks tape free.

At Indian Creek it seems best to start off with too much tape to save your skin while you hone your technique. As one gets more acquainted with each crack size you can decide if taping necessary.

indiancreek-march09128

Lizzy tapes up before the off-fingers Puma.

Shoes!!

The most important part of your shoes is that they allow your toes to lay flat. Tight, knuckle curling shoes with thin fabric should be left at home. Since you will repeatedly be jamming your feet you want your toes to be in a flat position allowing the shoe to get as far in the crack as possible. If you have stronger feet  and are climbing a smaller crack, I would suggest the Mocasyms.  I wear these shoes when climbing anything thin hands or smaller. I prefer a stiffer shoe such as the Sportiva Barracuda for larger cracks. I haven’t gotten Lizzy hooked on the Mocasysms yet so she generally wears her Miura for everything small and Barracudas for hand cracks [yeah, and that’s because Miuras are still the most awesome all-around climbing shoe ever made. period. oh, and also, I only wear La Sportiva. ~Lizzy].

indiancreek-march09063

My moc’s with a bit of Stealth Paint.

One of my experiments for this year was a helping of Stealth pain on my shoes. I was interesting in this product after seeing it on Ethan’s blog. Lizzy picked me up a package at the Five-Ten outlet in Redlands, CA and the night before we left I tried my best to coat my shoes. The kit includes a metal container of ground up bits of Stealth Rubber, a tube of Barge cement and some plastic applicators. I was hoping for a tube of pre-mixed stealth goo but to no avail. I mixed 2 spoonful of glue and 1 spoons of rubber in a disposable bowl. This instantly made a mess and the glue and bits of rubber were hard to mix into a spreadable substance. I mixed in more glue and tried to apply the rubber to my shoes. This did not work and the rubber moved around and did not stick. I applied a base layer of barge cement to the mocs to make sure the surface was nice and sticky and tried again. This worked much better and i was able to get a thick layer of rubber on my shoes. I still had extra rubber (from the 1st spoonful) which I applied to a second pair of mocs without the base layer of barge cement.

The fairly thick rubber on the first pair stayed on through the week of climbing at indian creek. Small holes did rip  as seen above but for the most part I was successful. However the second pair, with out the extra glue, quickly lost the rubber that I had applied. When I try this process again I plan on adding glue to the shoe and then sprinkling the stealth rubber dust directly on the shoe instead of mixing in a bowl. I think this will let me apply a finer layer and it should spread more easily.

Overall I have a got mixed impressions from the application process however once the Stealth Paint was on my shoes I was quite happy. Check out these reviews for proper application techniques.

indiancreek-march091582

Find the Lizard!?! There are at least 10 in this photo.

Weather.

Both of our visits have been in March and we have experienced a range of weather from snow to shirtless climbing. Around Moab the sun is bright and the wind can be quite chilling. It is fairly easy to chase either sun or shade since there are so many different crags at Indian Creek. If there is snow on the ground don’t expect the climbing to be pleasant in the shade. We found this out while trying to warm up on the far left side of battle of the bulge. We were wearing all our layers and were cold in the wind and shade while others were climbing shirtless around just around the corner.

Some crags, such as the Cat Wall have south-facing areas that trap the heat and can feel like an oven. It is best to figure out what time of year you are going before putting together a tick list. It seems that it can get hot as soon as April as you can see in a TR from when some of our friends went in 2008. While the fall and early spring seem like the best temps, many climbers chase the shade all the way through May and into the start of June.

Since all of the rock at IC is sandstone climbing must be avoided at all costs post rain. The rock wears easily due to it’s soft nature and water speeds up this process ten fold. The day it snowed we took a chance to explore some of the mountain bike trails around Moab. This was a fun alternative that was a good adventure despite a chilly breeze.


indiancreek-march091191

MOOOO!  Cows are one of the major inhabitants of the creek 😀

Wildlife

The main non-climbing use of the Indian Creek area is as a cow pasture. Negotiations with the local ranchers are done though the Friends of Indian Creek and the Access Fund. Since many of the crags are accessed through the ranch land make sure to do your part and close all cattle gates. It is important to keep good relations and pay attention to closures both due to the ranchers and bird nesting in the area.

indiancreek-march09114

Why does the deer cross the road? It was the chicken’s day off!

So far we have seen deer on every part of the the 211 from the exit off the 191 all the way past Newspaper rock to the bathroom at Beef Basin Road. Do be careful driving since the deer are often out in herds and are not afraid to cross the road right in front of your vehicle.  Perhaps this is a Utah thing, since we saw herds of deer every day when we drove from Orangeville to the various areas of Joe’s Valley. We think that maybe they need to replace the “Frequent Deer Crossings” signs with something a bit more applicable like “Frequent Deer Herds”.

Food, Water, and Waste

There is no running water or gas stations within 30+ miles of Indian Creek. The closest small town,  Monticello is about 15 miles south of the 211 – 191 intersection or about 30 miles away from the Beef Basin parking lot. Moab is a bit farther away at 40 miles north of the 211 – 191 junction and 55 miles from Beef Basin. Moab has numerous gas stations, a large grocery store, City Market, and many gear shops such as Pagan Mountaineering and GearHeads.

The desert around Moab and Indian Creek is fragile and proper waste disposal is necessary. It is not ok to just dig a hole where ever one chooses. I use paper grocery bags that are cut to about 4 inches tall which allows them to fold closed easily. After doing one’s business simply add some kitty litter deodorizer and put in a ziplock bag. This is a cheap way to make a WAG bag which is used in the video below.  Taking a little bit of extra time to dispose of waste properly helps keep Indian Creek beautiful for years to come!

Have a safe trip!

Luke


Montana de Oro: Trail Running 101

25 02 2009

Am I a runner? Could I ever be a runner?  What makes you a runner?

I took part in high school cross country and stayed fit playing ultimate frisbee in college but never thought to run just for the sake of running. Running fast or running far takes a lot of effort and putting in that time would detract from my climbing.  In college many of my friends were runners and I often ran because  I saw the health benefits of staying light. During a very focused study abroad in Australia I would often go for 8k to 15K runs around the city before class. These six months in 2005 were most likely my highpoint as far as frequency and duration. In my final years at college I ran at most four times a month and stopped completely after I graduated in 2007.

img_0657

In September of 2008 I decided that I needed to step up my fitness and start running again. I had stayed fit by climbing and biking to work but knew that I would benefit from more frequent cardiovascular exercise. At first it was just a casual 5k,  my favorite distance,  every week or so. Then, with some gained fitness,  I started doing slower longer runs with some of my co-workers.  I had not run more than five or six miles since Australia and it was a new challenge as we went for eight to ten mile runs. The more I ran the more I wanted to put my effort towards accomplishing a goal. Many of my friends have run a marathon, some more than once, so why couldn’t I?

img_0658

I started upping my mileage in the thought of doing a half-marathon, a good first step towards doing a marathon in 2010. After doing a couple of ten mile runs I was confident that I could go the distance, 13.1 miles.  My friend Julie, from Bucknell, helped me find a race organized by Pacific Coast Trail Runs that would meet my distance requirement with the added benefit of beautiful scenery. While in my mind running is usually just a means to an end, I was excited to travel to a new part of the California coast and for a chance to push myself. In the month or so before the race I slowly upped my weekly mileage and enjoyed cruising the trails and streets around where I live in San Diego.  The week before the race I rested, tapering to allow my body to recover, and worked out what I would eat and drink during the race.

img_0659

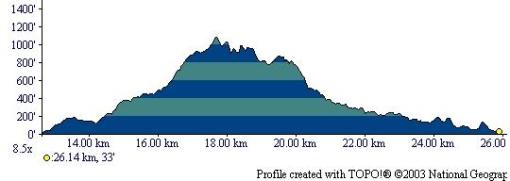
Logistically I ran my 25k on two GU’s, a Clif Shot, and ~20 oz of water. I had practiced carrying a water bottle and my support crew, Julie, Josh and Lizzy, gave my bottle at the half way point in the race. Julie and Lizzy had already finished the 8k and were waiting with Josh for my resupply. I was able to meet up with them because the 25k was separated into two loops, Valencia and Hazard Peaks with an aid station in the middle at the Start/Finish point. A short version of the first loop, called Valencia Bluffs, was used by those in the 8k, which bypassed the steep run to the Valencia peak. The second loop  was of equal elevation gain ~1600 feet but over a much more moderate grade. The running was scenic and I had a good time despite running out of energy in the last couple of miles. I am sure if i had done base work over 10 miles I would have had more energy. By the end of the race I drank all of my water and wished that I had stopped for a bit more food.

elevation2

Elevation Profile Courtesy of PC Trail Runs

I had a blast and am interested in running some races in the future of similar distances 18k – 30k. If I run a race with a similar elevation profile (3200 feet over 25k) I will have to do more hill training. Not only was I slow running up the hills but my core was unable to sustain as fast of a pace down the hill as I would have liked. I had to hold back on the extended downhills due to unexpected fatigued.  We will see if I have the time and energy in the future to devote to training for another long race. Hopefully I can keep up with my weekly running routine and start upping my mileage again.

Cheers,

Luke
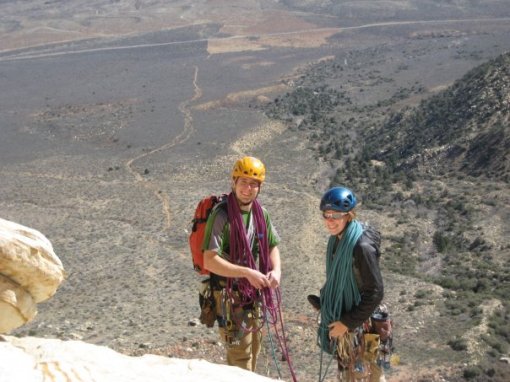
Photos thanks to Julie and Josh!


Sweet Gear: A General Rope Review

22 01 2009

Back in 2001 I bought my first rope a Mammut Tusk at 10mm 50 meter. I had been climbing on partners ropes for the previous year or so and it was time for my own rope. It’s main purpose was short sport climbing so I didn’t mind the 50m length. This rope has aged well and I still use it for occasional top roping or anchor duty. It is a bit fuzzy after almost 8 years of use but I have managed not to get any core shots. Since pitches keep getting longer I doubt I would ever buy a 50 meter rope again.

yosemite-june-07-115

Practicing the Portuguese Bowline on Sickle Ledge on The Nose with the Mammut Tusk

My next rope was a Maxim Whippet bought the first year of college at REI. It was the only 70m rope they were selling at the time and it was on sale!! This rope made its way to Australia where I sold it to fund a bouldering trip to New Zealand. During its two years of use it was my main rope, lighter than the Tusk and a joy to use.  It was my first skinny rope, 9.5 mm, even though it was supposedly a bit heavier than average. It wore well and I would have kept it except I was able to sell it for close to what I payed for it and didn’t have to carry it home to the US.

yosemite-june-07-119

Lizzy having fun during our short stay on El Capitan

Upon my return I purchased a 60m Mammut Infinity 9.5mm . This rope has been awesome and quite durable. While it is marketed as 9.5 it feels fairly thick and definitely fuzzed up a bit over the years, so it doesn’t feed super fast in a Gri-Gri. Regardless, I enjoy the clipping action and even though we had to cut the ends off, making it only about 155 feet,  I still like using it.  So far this is my favorite rope and at some point I will likely get a new one of the 70 meter variety. It is light enough for a hard redpoint but still durable to last on day of projecting.

squamish-sept-07-094

The end of a fun day in Squamish with the Infinity.

Around the same time I got the Infinity I picked up a pair of Beal Verdon II double ropes. At 9mm and 60 meters they were perfect for taking multiple followers on trips to the Gunks. These are a bit heavy for doubles but have worked well during their limited use. Lizzy and I used only one of these ropes as a superlight way to simul Royal Arches and Cathedral Peak. The use as a fast and light single as well as a lighter rap line adds value to these two ropes. I would not purchase such a thick set of doubles again but would consier the Beal Ice Line 8.1 mm orthe Petzl Dragonfly 8.2 mm.  I have used my friend Hartley’s Ice Lines and they are quite thin and light, though not as durable as our current doubles.

n3802675_31410505_8253Coiling the doubles on Solar Slab in Red Rocks.
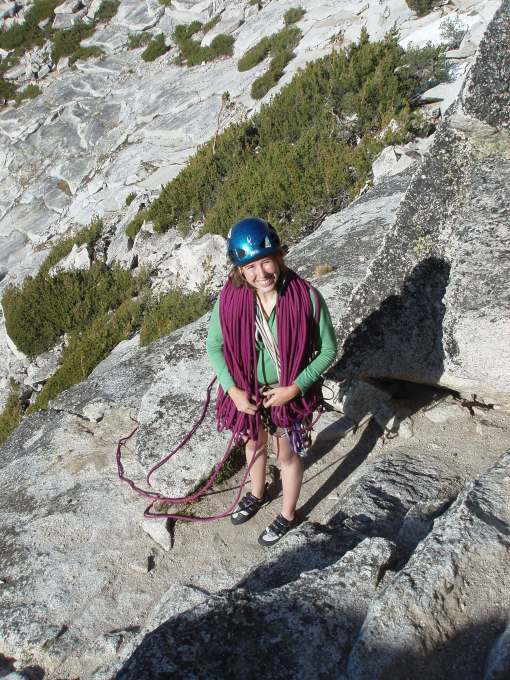
Also in 2006 I got a Beal 8mm by 60m static trail line that I use for rappeling.  Initially purchased for aid climbing I worried about its long term durability. This rope was super light (40 g per meter) and went up many multipitches before it got stuck on Cloud Tower (Red Rocks)  in October of 2008. It was the perfect small rope for stashing in the pack for when one needed to do double rope rappels.

yosemite-june-07-252Lizzy is ready with the Beal Verdon II after a fun trip up Cathedral Peak.
Also in college I got another Mammut Tusk this time in a 60m length. We found this rope at the RRG and after multiple postings at Miguels it came home with me. Wary of a used rope this has been relegated to TR and Aid climbing duty.  It has seen use and spends most of its life in our rope box.

tahquitz-may08011

Enjoying the 70m Petzl Fuse at Suicide Rock.

After graduating college I was anxious to get a 70meter rope again and bought the 9.4 mm Petzl Fuse. This rope was excellent until it got a core shot in the middle while descending the Incredible Hulk. We got super lucky because while we were unable to retrieve the cord, we ran into another party who hiked it down and I was able to pick it up at the Bridgeport ranger station. Fortunately I was able to salvage the pieces of the Petzl rope and kept the two parts since the rope was  still fairly new. I use the shorter section for a lead rope at the gym and the ~35 meter piece is perfect for short sport climbs such as our recent trip the Gallery in Red Rocks.

One of my ropes came to me by chance when I won a Sterling Marathon Pro 10.2 Bi-Color 60meter rope. This is the thickest rope I own and it shows. It however has been a great workhorse and accompanied me on my first 12c redpoint. Lizzy doesn’t like this rope at all and with a dry coating it is quite dirty but it has worn well despite constant use as a TR rope. It feeds ok through the Gri-Gri, mainly due to its slick dry coated sheath which is slowly becoming fuzzy. I wouldn’t buy such a thick rope but it impressed me enough with Sterling to buy one of their thinner ropes.

elcapfrog

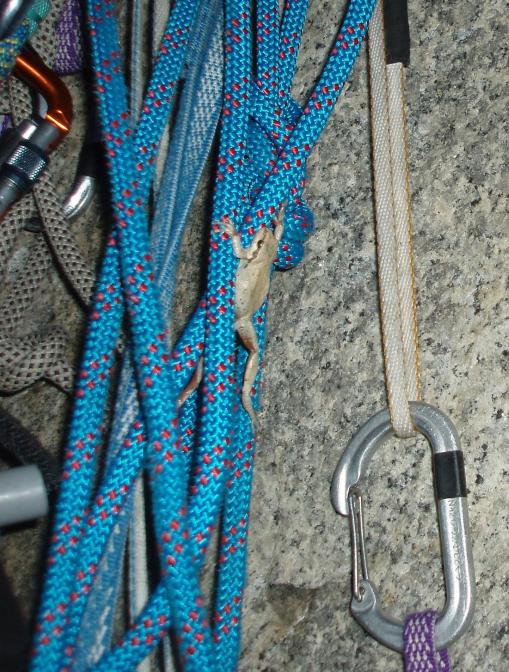
The already fuzzy BlueWater static line with the frog we found on El Capitan.

After chopping the Petzl rope in half I was again in need of a 70m rope. I purchased a Sterling Ion at 9.5 mm and have only used it a few times. The main disappointment was the lacking middle mark. However it runs smoothly and clips well. It is quite small and feeds fast through the Gri-Gri. You have to be a bit careful lowering which is similar to the Petzl Fuze. Once this rope gets a few more pitches I will report back on it’s durability.

We also own a Bluewater static haul line that I bought for a trip to Yosemite. During the short time on the Nose, we bailed from Sickle, it showed alarming wear. As well the rope was super stiff and did not handle well. This along with some experiences with Bucknell Climbing Club ropes in college, makes me stay away from Blue Water.

rumney-july-08-004

Lizzy and Rebecca and a pretty pink Beal rope at Rumney

Lizzy has a pink 60m  Beal Flyer II which is 10.2 but feels really skinny, more like a 9.8.  Lizzy loves it for its soft catch, even though I think it is too stretchy. It handles well but kinks easily due to it’s supple nature. She has had it for many years and I am anxious to turn it into a RUG…

index-aug-07-059

The well loved Edelrid LiveWire

Lizzy also has an  Edelrid Livewire. 70 meter 9.8. This rope has been our long route work horse and has taken a lot of abuse since Lizzy bought it back in 2006. Despite being fairly cheap at REI this rope has held out really well and cleaned up nicely after we washed it. It is still the go to rope for the 100+ foot pitches at the Riverside Quarry. Between this rope and a 10mm Edelrid of Leah’s (I think its a Hawk) that I used I have respect for the durability and handling of the brand. Even though it is getting old I hope that we won’t have to retire it any time soon.

Overall I think my ranking is as follows:  (Top being the best, in my opinion)

Mammut – Clips well and last a long time.
Petzl – A bit on the stiff side but handles and wears well.
Sterling –  Soft and a bit kinky but durable.
Edelrid – Feeds and clips well and stands up to abuse.
Maxim – Heavier than average but clips well.
Beal – Too stretchy and seems to fuzz easily.
PMI – A bit slippery but clips well.
BlueWater – Heavy and not very durable.

Cheers,

Luke


New Feature: Favorite Routes

29 10 2008

We’re finally starting to take advantage of the awesome wordpress feature that allows us to have pages on our site in addition to the blog. Our first addition is the new Favorite Routes page. On it, we each have a list of ten of our favorite routes and a brief explanation of why it’s so awesome. If you happen to be in Squamish, Smith Rock, Joshua Tree, etc., consider trying one of them.

We’ll probably update the list as time goes on because we’ve only included routes that we’ve actually sent (i.e. lead clean).

Next up, look for our top ten tick lists for more awesome routes that we’re still working on.

Enjoy and rock on,

Lizzy


Sweet Gear: Approach Shoe Reviews

23 09 2008

For me, approach shoes are very important. The comfort and security I feel when I’m hiking and scrambling to the base of a climb can help set my mood for the day. If I’m uncomfortable while hiking or sliding around and nervous while scrambling, it’s no good. So I thought I’d share my approach shoe experiences for your benefit or to get some of your thoughts about shoes.

Five Ten W’s Mountain Master

I absolutely hated these shoes. They did not fit well, were not sticky, and had ridiculously stiff soles that killed my feet. Even with my superfeet insoles, they were no good. I was not at all impressed. This is probably why they don’t make these any more.

Five Ten W’s Access

These shoes aren’t really approach shoes, they’re trail running shoes. For trail running shoes, they’re quite nice. They fit well and are very comfortable. For just hiking, they are great. However, they aren’t made for scrambling and don’t really perform well there. They’ve been demoted to my “just hiking” shoes, but that doesn’t mean I don’t still love them. Also on the downside, the construction of the shoes seems not to be the highest quality. A lot of little decorative things on the shoes (nothing functional) took about a week to fall off.

Montrail W’s CTC

These shoes are absolutely fantastic. They fit great, are comfortable for hiking, work great for scrambling (I lead Tenaya Peak wearing these instead of my rock shoes), and last forever (except for the laces, but these are fairly easily replaced). They are vented so that your feet don’t get too hot, although it also means your feet get wet if it’s raining/snowing/etc. But if you are dealing with a lot of those conditions, I’m pretty sure you need a different kind of shoe anyways. My sensitive feet love the CTCs and I can wear them for hours and hike long distances with no blisters. My first pair of CTCs have been going strong for three years (although they recently got “retired” to the brutal job of being my geology shoes). I now have a newer version of the shoes, which Montrail thankfully let remain essentially the same except for the color and the laces. Highly recommended!

Montrail D7

I haven’t had a lot of opportunity to use these because I got mine used and they are sized a little too small to be comfortable for hiking a lot. I know plenty of guides who swore by these a while ago, though, so they can’t be that bad.

La Sportiva Cirque Pro

I just got a pair of these last weekend at the REI used gear sale (wooo $8!!!) and I’m very excited. From just trying them on, they fit my feet perfectly (although I do seem to have La Sportiva feet) and feel very comfortable. I’m excited to try them out after I get them resoled.

What approach shoes work for you?

Lizzy


Rope Management 101

26 02 2008

Multipitching is a great thing to do – climb lots of pitches in a row, get way high off the deck, push your mental and physical limits. Awesome, right? But one thing I know that is not awesome about multipitching is rope spaghetti – that mess of ropes and slip knots and having to step in, around, through little loops of rope just to be able to start leading again, only to get shortroped because the rope is hopelessly tangled down at the belay. But do not despair, you can fight this evil! I’ve compiled some basic tips garnered from Luke’s and my experiences on long routes trying to fight the tangle.

Rope spaghetti in action:

The Basics

(1) It’s almost always worth the extra time to organize your ropes. The time saved not having to undo a knotted rope is important.

(2) When you have 2 followers (especially if you’re belaying both on a reverso), separate the ropes as you bring them up. Whoever has to lead next with both ropes will thank you for not getting short-roped the entire pitch.

(3) Take care to keep your leash (clove-hitched end of the rope and/or your daisy chain – basically your attachment point to the anchor) away from the ropes you pull up and the leashes of your follower(s). You don’t need to put to much brainpower into belaying, so as you do, think about where to direct your follower(s) when he/she/they arrive. Usually you want your leash(es) to be on top of everything and the followers to be underneath everything.

The Giant Ledge Belay

This is the easiest situation – you have a nice, big ledge with plenty of room to flake your rope(s) onto the ledge. If you have 2 ropes, put them in separate piles. If you are leading the next pitch, remember to “pancake flip” the rope pile(s) – just pick up the whole thing and flip it upside down.

Alex Pelman and I enjoying a huge ledge low on North Early Winter Spire (North Cascades – Washington Pass):


The Small Ledge

This starts to get complicated. Sometimes you reach the anchor and you have a ledge, but a small one. Sure, you could just flake the rope onto the ledge on top of your feet, but what if you have 2 ropes? And then where are the follower(s) going to stand? This is where the stacked lap coils come in. Luke and I use this all the time and it works really well. It deserves it’s own section, so keep reading to find out more!

Alex Pelman and I keeping the ropes organized on this small ledge on North Early Winter Spire:


The Small Stance

As the area you have to stand on gets smaller, you have to be even more careful about where to direct your follower(s) so as not to get the rope(s) twisted.

The Dreaded Hanging Belay

The hanging belay can be pretty uncomfortable, but it does have the advantage of actually making lap coils a little easier because you can make longer coils (since for most hanging belays the coils will just dangle below you).

And now… (drum roll)…

Stacked Lap Coils
Unfortunately I don’t have a picture of this technique (I guess the belay stance isn’t exactly the most exciting image of the climb…) so I’ll try to describe it the best I can. The basic idea is to use your leashes to make lap coils of the ropes as you belay them up (this is mostly for having 2 followers or just using double ropes). I usually connect my daisy chain at it’s greatest length and then adjust the length of my clove-hitched rope to the anchor such that it’s either about 1 foot longer or shorter than my daisy chain. Then I pull the ropes up one by one and coil each onto either my rope leash or my daisy chain. I continue to coil the ropes like this as I belay the followers up. That way you get each rope in a separate (hopefully neat!) coil so they will be relatively unknotted for whoever leads next. In order for this to work, you probably need to be using a Reverso or equivalent auto-locking device that allows you to have your hands available to keep your 2 coils neat as you go.

There is a little strategy you can use in your coils to make you life even easier. For example, if one of your followers is leading the next pitch, you should start your coil with longer loops and gradually shorten the length of the loops as you go, such that when you belay from the coil, the loops won’t catch each other and make slip-knots. If you’re leading the next pitch, you should try to make the coils about the same length (because you’ll have to pull loops from the bottom of the coil and it gets messy if you try to go small –> large loops).

And as a bonus, here’s some handy rope management for the descent (especially good in Red Rocks!)

The Rappel

Red Rocks can really show you exactly how much a rock can want to grab your rope and not let go. Although you mostly just have to be good at pulling the rope and positioning it while rappelling with good technique and a lot of luck to not get it stuck on the pull, there is something you can do to keep from having to swing all over the place to fix stuck rocks just to get to the next rap station. You can coil one (or both, if you have them) ropes and wrap a sling around each one (clipping the ends of the sling into the same carabiner. You don’t want it to to be wrapped too tight or else it won’t feed well while rappelling. Clip your rap device on the rope and you’re ready to go. No more stuck ropes (or, at least, one less).

Luke demonstrates on the rap off Solar Slab (Red Rocks):


That’s all for now, so good luck everyone with managing the rope spaghetti! I may write another blog or two about rope drag or fast leader change-overs if anyone’s interested (or I get bored…)

Lizzy